If you want to take your office setup to the next level, a ceiling-mounted projector screen is a game-changer. Whether you’re setting up for presentations, movie nights, or video conferences, a motorized projector screen adds convenience and professional flair. But how do you install one effectively? This guide covers everything you need to know, including installation tips, wiring guides, and step-by-step instructions for a smooth and professional installation process. Let’s dive in!
What is a Ceiling Mounted Projector Screen?
A ceiling-mounted projector screen is a screen that is installed directly into the ceiling of a room. Unlike traditional projector screens that sit on stands or walls, ceiling-mounted screens are ideal for offices and home theaters where you want to save space and maintain a sleek, clean look. Motorized screens, in particular, can be raised and lowered automatically at the press of a button, adding ease and sophistication to any setup.
Why Should You Install a Ceiling Mounted Projector Screen?
Installing a ceiling-mounted projector screen can transform your office or home theater space by offering several benefits:
- Space Saving: Ceiling-mounted screens don’t take up valuable floor or wall space, making them perfect for rooms with limited space.
- Cleaner Aesthetic: With no bulky screens or stands cluttering up the room, your setup looks cleaner and more organized.
- Convenience: Motorized screens can be controlled remotely, making it easy to retract or deploy the screen whenever needed.
- Improved Viewing: A ceiling-mounted screen offers optimal viewing angles, especially when placed centrally in the room.
How to Choose the Right Ceiling Mounted Projector Screen?
When selecting a ceiling-mounted projector screen, consider the following factors:
- Size: Make sure the screen size fits the space and provides an adequate viewing area. Most projector screens come in sizes ranging from 80 inches to 120 inches.
- Motorized or Manual: A motorized projector screen is convenient, but it comes at a higher cost. Manual screens can be more affordable but require more physical effort to adjust.
- Aspect Ratio: Choose between standard (4:3) and widescreen (16:9) ratios based on the type of content you plan to project.
- Material: Look for screens made from high-quality materials like matte white or high-gain fabric for better image quality and contrast.
How to Install a Ceiling Mounted Projector Screen?
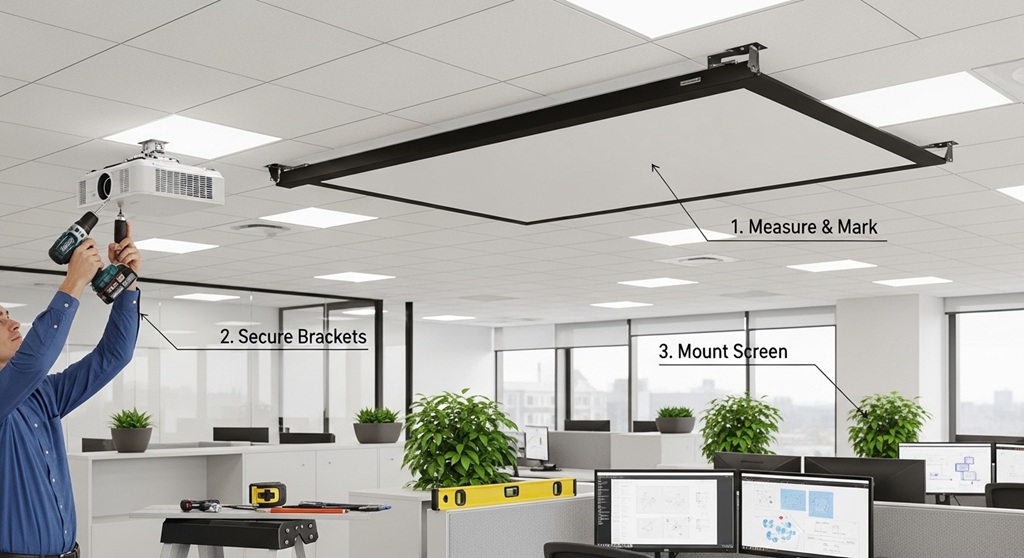
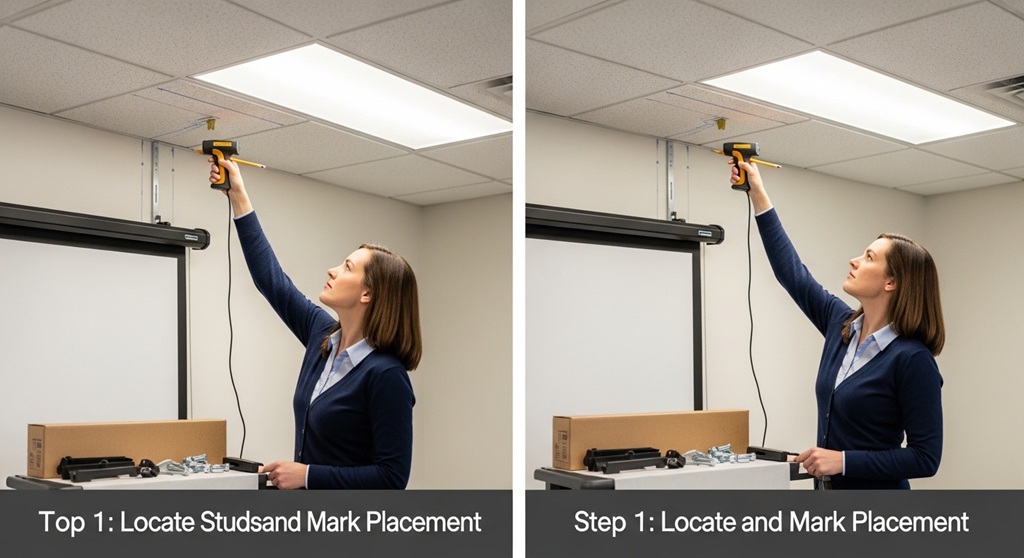
1. Preparing the Area
The first step in installation is preparing your workspace. Make sure to clear any obstacles and measure the room’s dimensions to ensure the screen will fit appropriately.
- Identify a central location on the ceiling for the projector screen. Ideally, it should be centered with your projector.
- Ensure there is enough clearance around the screen for it to deploy fully.
- Mark the location for mounting brackets using a measuring tape and pencil.
2. Mounting the Brackets
Next, it’s time to mount the brackets that will support the projector screen.
- Using a stud finder, locate the studs in the ceiling where the brackets will be mounted. Ensure that you’re mounting them securely into the studs for proper support.
- Attach the ceiling mounting brackets to the studs using heavy-duty screws. Make sure they are level for a balanced installation.
3. Attaching the Projector Screen
Once the brackets are in place, it’s time to attach the screen itself.
- Lift the projector screen and carefully hang it on the mounted brackets.
- If your projector screen is motorized, connect the wiring to the motor, ensuring it’s properly aligned for smooth operation.
- Check that the screen deploys and retracts smoothly to ensure everything is functioning as expected.
4. Wiring the Motorized Setup
For motorized projector screens, wiring is an essential part of the installation. Here’s how to wire it up:
- Locate the power source and run the power cable from the projector screen’s motor to the nearest electrical outlet.
- If your screen is controlled via a remote, follow the manufacturer’s instructions for connecting the remote control system.
- For a more integrated setup, consider wiring the screen to your home automation system for seamless control.
5. Final Testing
Once everything is installed and wired, it’s time to test the projector screen.
- Turn on the motorized screen and check the movement. Ensure that the screen deploys evenly and doesn’t show any signs of malfunction.
- If the screen doesn’t deploy correctly, check for any wiring issues or alignment problems with the motor.
- Make sure the screen is positioned correctly in your room for optimal viewing angles.
Tips for a Successful Ceiling Mounted Projector Screen Installation
Here are some additional installation tips to ensure a smooth and successful setup:
- Double-Check Measurements: Before mounting anything, double-check your measurements. A small miscalculation can lead to uneven placement of the screen.
- Use the Right Tools: Having the right tools is crucial for a clean, professional installation. A level, drill, screwdriver, and stud finder are all essential tools for the job.
- Power Supply: Make sure there is a nearby power source for your motorized screen. Consider hiring an electrician if you need to install an additional outlet or if the wiring seems complicated.
- Check Compatibility: Ensure that the projector and screen are compatible in terms of size, aspect ratio, and resolution for the best viewing experience.
How Do You Maintain a Ceiling Mounted Projector Screen?
To keep your ceiling-mounted projector screen in top condition, regular maintenance is important:
- Clean the Screen: Gently clean the screen with a soft cloth to remove dust and dirt. Avoid using harsh chemicals that could damage the material.
- Check for Damage: Regularly inspect the screen for any signs of wear or damage, especially if it’s motorized. If you notice any issues, address them quickly to prevent further damage.
- Check the Motor: If you have a motorized screen, ensure that the motor operates smoothly. If it becomes noisy or sluggish, consider lubricating the motor or having it serviced.
Conclusion: Get Your Ceiling Mounted Projector Screen Up Today!
Installing a ceiling-mounted projector screen can be a game-changer for your office or home theater setup. With the right tools and a bit of patience, you can have your screen up and running in no time. Whether you opt for a motorized or manual screen, the installation process is straightforward when following the proper steps. So, what are you waiting for? Start installing your ceiling-mounted projector screen today and enjoy a seamless, professional setup!
Call to Action: Ready to Transform Your Office Setup?
If you’re ready to install your ceiling-mounted projector screen, gather your tools, and follow the steps outlined in this guide. Don’t forget to double-check your measurements and make sure everything is properly wired. Enjoy the new setup, and don’t hesitate to share your experience with us in the comments!
Frequently Asked Questions
1. Can I install a ceiling-mounted projector screen by myself?
Yes, you can install a ceiling-mounted projector screen by yourself as long as you have the right tools and follow the instructions carefully. However, if you’re unsure about electrical wiring or mounting, consider hiring a professional to ensure a safe and secure installation.
2. How do I choose the right size projector screen?
The size of the projector screen should match the size of your room and the projector’s capabilities. Typically, projector screens range from 80 inches to 120 inches. Consider the viewing distance and your projector’s resolution when selecting the size.
3. How do I wire a motorized projector screen?
To wire a motorized projector screen, you need to connect the power cable to a nearby outlet and ensure that the control system (remote or wall switch) is correctly wired. Follow the manufacturer’s wiring instructions for seamless operation.
4. Can I install a ceiling-mounted projector screen on drywall?
It is possible to install a projector screen on drywall, but you must use proper anchors and screws to ensure a secure mount. It’s highly recommended to install the brackets into ceiling studs for maximum support.
5. How do I maintain my ceiling-mounted projector screen?
Maintaining your projector screen involves regular cleaning with a soft cloth, checking for any damage or wear, and ensuring that the motor operates smoothly (if it’s motorized). Regular inspections will help keep your screen in top condition.
6. Is a ceiling-mounted projector screen suitable for a home theater?
Yes, a ceiling-mounted projector screen is an excellent choice for a home theater setup. It offers a clean, professional look and saves space while providing optimal viewing angles for movie nights or gaming.
7. How long does the installation of a ceiling-mounted projector screen take?
The installation process typically takes a few hours, depending on the complexity of the wiring and the type of projector screen. With the right tools and instructions, you should be able to complete the setup in a half-day.
Read More Also: Must-Have Features in Commercial Office Vacuum Cleaners
Find out: How to Build a Real Estate Business Plan That Creates Sustainable Property Income